Cache is the temporarily stored data of an app which speeds up the process of the app launch as the latter doesn’t have to reload the data from scratch, instead, it could simply pick it up from cached memory. With that said, if a lot of cached data gets accumulated over the due course of time or if the stored cache data gets corrupted, then the app might be slow/fail to load or even not function along the expected lines.
Likewise, if the cached data gets corrupted, then also you might face quite a few issues in interacting with that app. Therefore, in all these scenarios, the best bet is to delete these temporarily stored data from the device, and for that, there are quite a few methods that one could opt for. In this guide, we will be having a look at some of the most prominent methods to delete the cache on Android, including ADB, Fastboot, and Recovery. Follow along.
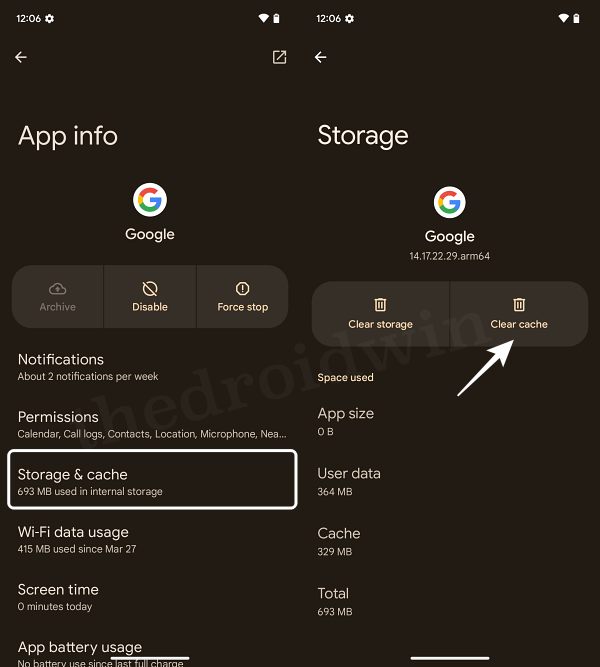
How to Delete Cache on Android via Settings Menu
It is the most straightforward way of getting the job done. Here’s how:
- Head over to Settings > Apps > All Apps > Select the desired app.
- Then go to its Storage and Cache section and tap on Clear Cache.
- That’s it. It will now remove the cached data of that selected app.
How to Clear Cache on Android via ADB Commands
- First off, find the package name of the app whose cache you want to delete.
- For that, you may use a third-party app like App Package Viewer from Play Store.
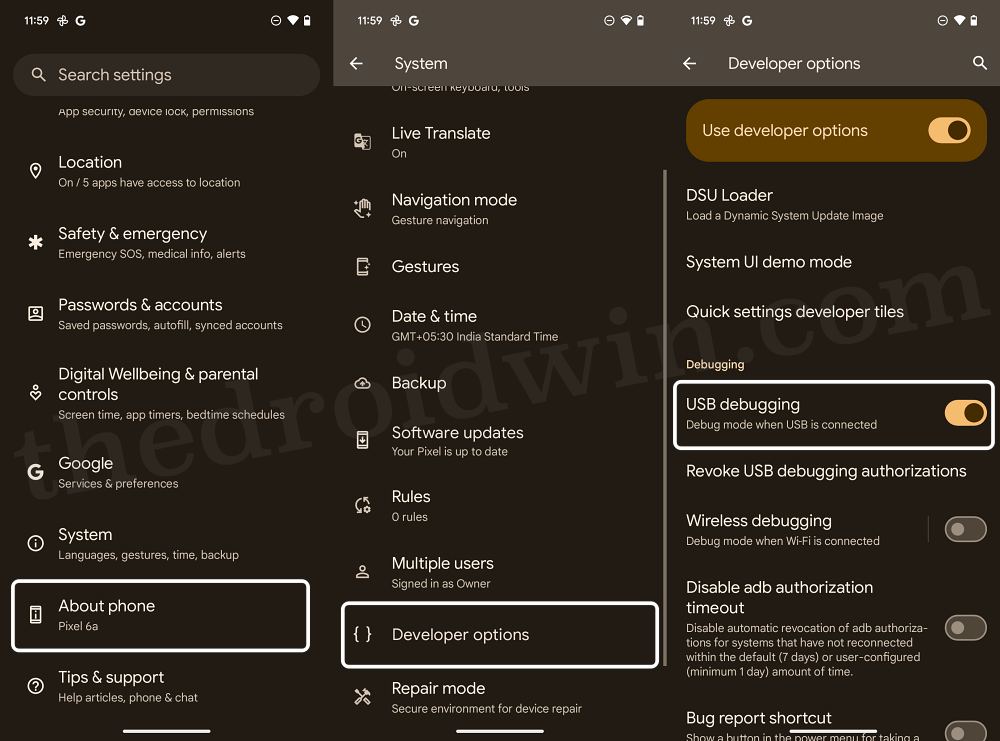
- Now download and extract the Android SDK Platform Tools on the PC.

- Then enable USB Debugging on the device and connect it to PC via USB cable.
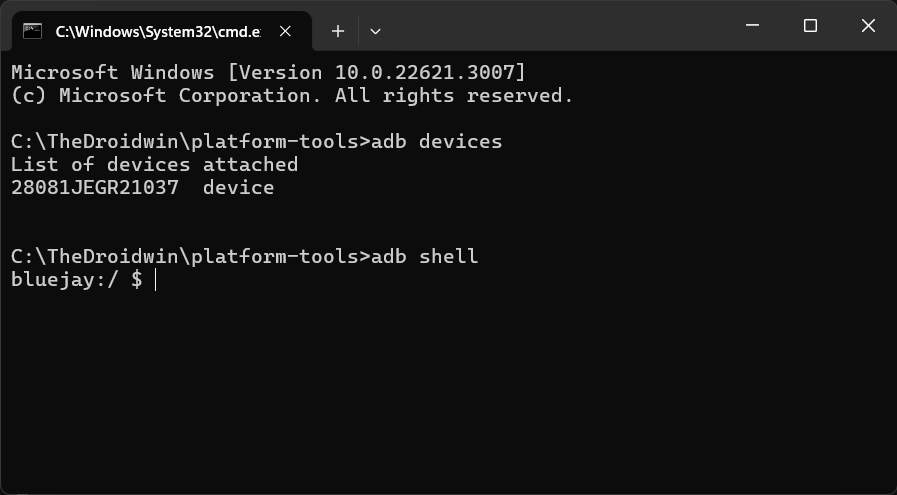
- Now open Command Prompt inside the platform-tools folder.
- Then type in the below command to open the ADB Shell environment:
adb shell
- Now type in the below command to delete the cache [replace packagename]
pm clear --cache-only <packagename>
- If the above command doesn’t work out, then you may also try out the below one:
run-as <packagename> rm -rf /data/data/<packagename>/cache/*
- Apart from that, you may also use the below command as well:
run-as <packagename> sh -c "rm -rf cache/*"
- If your device is rooted, then you may also use the below command
su -c "rm -rf /data/data/<packagename>/cache/*"
- You might get a SuperUser request after executing the command, so tap Grant/OK.
Clear Cache of All Apps via ADB Commands
Instead of deleting the cache of individual apps, a much better approach would be to do so for all apps at once. This will save a considerable amount of time and effort. But there’s a catch- the command will ask for the size of the cache that needs to be deleted.
Since it is quite difficult to predict the exact value, we use the maximum possible one [such as the total internal storage]. It accepts value in KB/MB/GB and my device’s internal storage is 256GB, so I’ll use 256GB as the value as it will delete all the cache from the device storage [make sure to replace the value in your case accordingly].
adb shell pm trim-caches 256G
Delete Cache and Data of Android App via ADB
If you wish to delete both the app’s data and cache in one go, then carry out steps 1 to 6 from above and then execute the below command [replace packagename accordingly]
adb shell pm clear <packagename>
Delete Cache and Data of all Android Apps Via ADB
If you plan to delete the cache and data of all the installed apps on your device, then the below command will come in handy.
adb shell cmd package list packages|cut -d":" -f2|while read package ;do pm clear $package;done
Delete Dalvik Cache via ADB Command
Apart from the app’s cache, it is also recommended to delete the system cache aka the Dalvik/Art Cache. However, for that, you will need to have a rooted device [or a custom recovery which is explained later on in this guide]. So refer to our guide on How to Root Android Devices via Magisk and only then proceed with the below steps;
- To begin with, open the Shell environment via the below command:
adb shell
- Now type in the below command. You’ll get a SuperUser request, tap Grant.
su
- Then type in the below command to delete the Dalvik Cache:
rm /data/dalvik-cache/*
- Finally, restart your device via the below command:
adb reboot
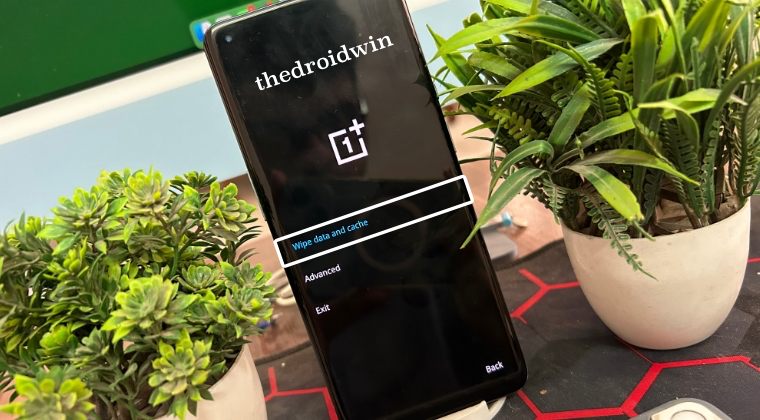
Delete Cache via Recovery
Deleting cache via the recovery is a relatively easier process as well and usually comes in handy when the device is not able to boot to the OS. Moreover, you could carry out this task both via a stock recovery as well as a custom one [such as the likes of TWRP and OrangeFox]. If we talk about the latter, then it requires an unlocked bootloader as well, so unless you are already having an unlocked bootloader, it wouldn’t make much sense to do so just for the sake of clearing the cache.
Though one benefit of TWRP over stock recovery is the fact that you could only delete the Dalvik Cache using it, which may or may not be present across numerous stock recoveries [still it’s not much of a perk that would compel the majority to have the bootloader unlocked as the repurcussions far outweighs the benefits involved].
As far as the support for this functionality is concerned, not every OEM gives the option to delete the cache from recovery and not every device has a working custom recovery. With that said, you’re more often than not likely to support any one of these two features, if not both. With that said, here’s how you could get this job done across both the custom and stock recoveries:
Via Stock Recovery
- Use the below command to boot your device to the recovery:
adb reboot recovery
- Then use the Volume keys to highlight Clear Cache/Delete Cache.
- Now use the Power key to confirm and the task stands complete.
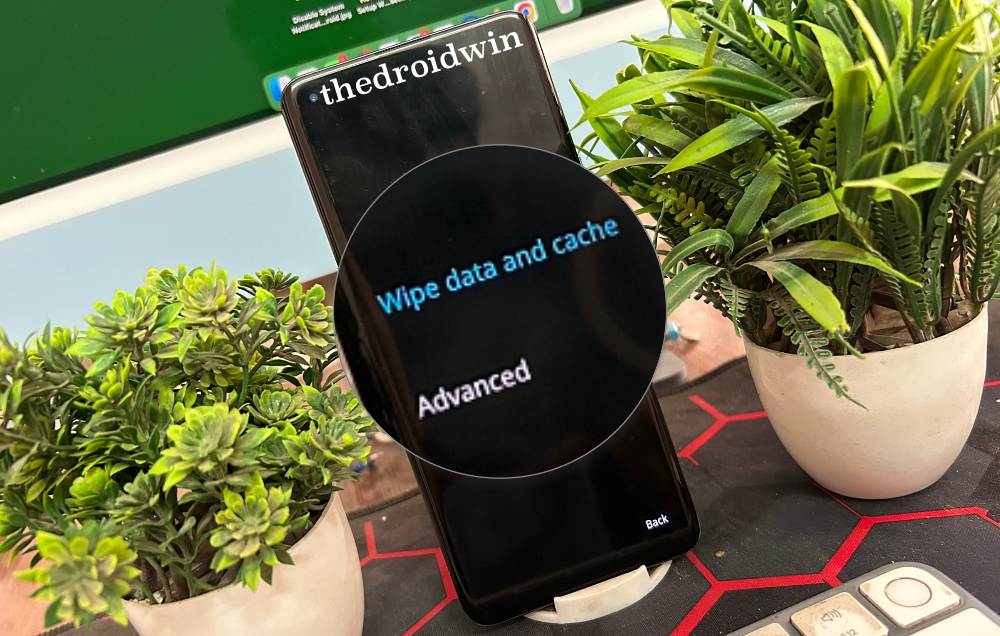
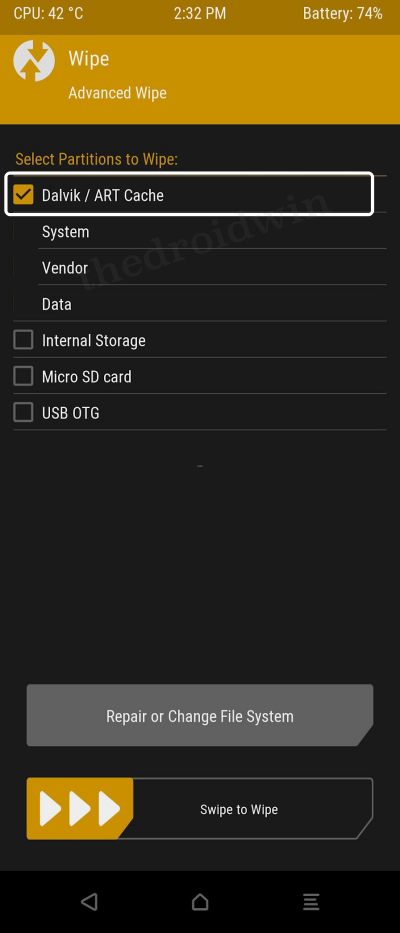
Via Custom Recovery
- Use the below command to boot your device to the recovery:
adb reboot recovery
- Then go to Wipe and check Dalvik/Art Cache and Cache partitions.
- Finally, do a right swipe to wipe both these partitions and that’s it.
Delete Cache via Fastboot Mode
You could also delete the cache on your Android device using the Fastboot Commands, as explained below:
- Boot your device to Fastboot Mode via the below command:
adb reboot bootloader
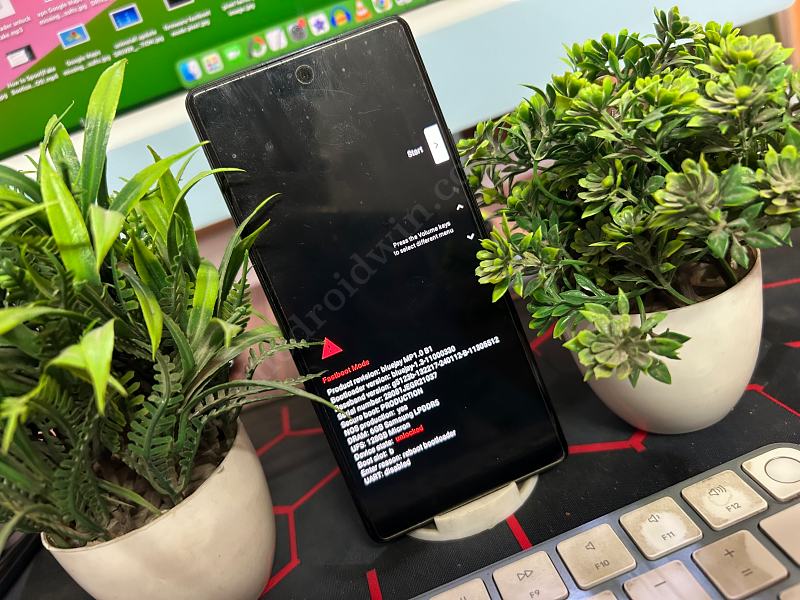
- Then type in the below command in the CMD window and hit Enter:
fastboot erase cache
- Finally, reboot your device to the OS via the below command:
fastboot reboot
That’s it. These were the various methods to delete the cache on any Android device via ADB and other related methods. Do note that there also exist many third-party apps that claim to get this job done. However, most of them are flooded with ads and apart from a decent UI/UX, don’t have anything worthwhile to offer, so it’s better to stay away from them and use one of the methods listed above.