
This guide will show you the steps to enable Categories in the Google Drive app on your Android device. This file storage and synchronization service from the Silicon Valley giant hardly needs an introduction of any sort. Apart from offering a generous 15 GB of free storage space [which is shared across other Google apps and services as well], its’ deep integration into the Android ecosystem as well as other Google services makes it the go-to choice for the masses.
Moreover, it also tends to get blessed with new functionalities at regular intervals. The latest one to make its way is the ability to enable categories in Google Drive. This will give you the opportunity to add your files to any one of the following twelve categories, thereby making it quite easy to get hold of the desired file from the plethora of ones that would be present in the Drive. Apart from that, it also spells out a clean organization of files, instead of being randomly scattered.
-
- Auto
- Banking
- Expenses
- Home
- IDS
- Insurance
- Medical
- Pets
- School
- Taxes
- Travel
- Work
A similar feature is already present in Google Workspace wherein the admin could create labels and users could add them to their files and folders. So initially it was speculated that this feature is also only intended for Workspace users but fortunately, that isn’t the case as any user could enable Categories in the Google Drive app. So on that note, let’s show you the steps to get this job done right away.
How to Enable Categories in Google Drive right away!
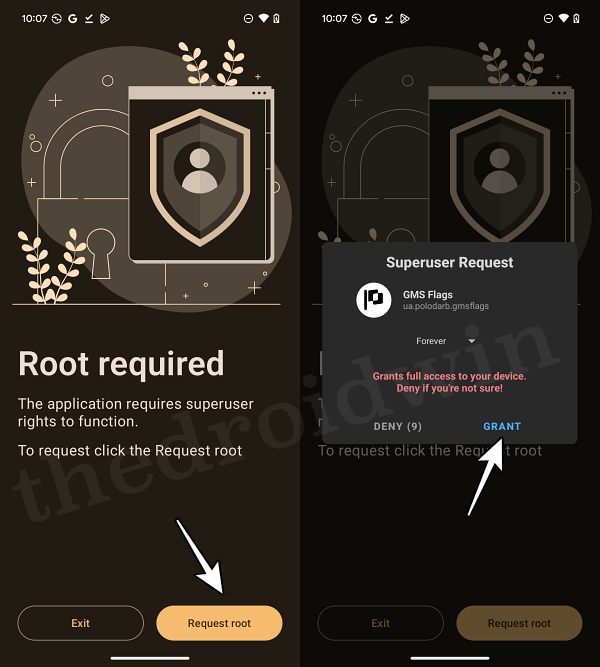
- First and foremost, you’ll have to root your device via Magisk.
- Then update the Google Drive app to the latest version.
- Now download and install the GMS Flags app from GitHub.
- Launch the app and grant it the Magisk SuperUser request.
- Then go to the Apps tab and search for the Google Drive app.
- Type in the below package name in the search box and open it.
com.google.apps.drive.android#com.google.android.apps.docs
- Now enable the toggle next to the following four flags:
SmartCategoriesFeature__smart_categories_on_homepage
SmartCategoriesFeature__smart_categories_manage_categories_action
SmartCategoriesFeature__smart_categories_for_search
SmartCategoriesFeature__smart_categories_backend_calls
- If you cannot find these flags, then tap on the overflow icon and select Add Multiple Flags.
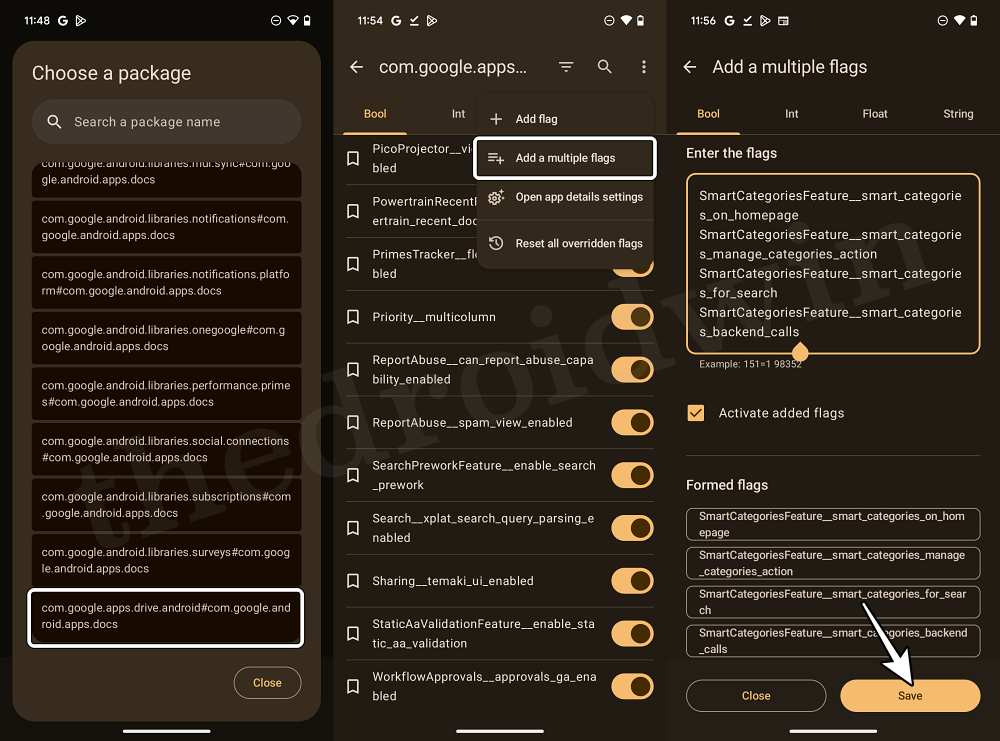
- Now add these four flags, one in each line, and then hit the Save button at the bottom right.
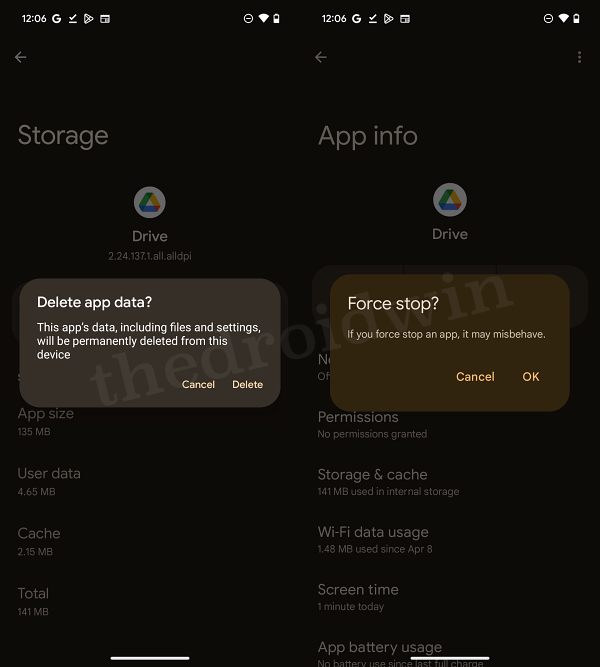
- Once done, delete the data and force-stop Google Drive.
- Now launch the app and the changes should be live.
That’s it. These were the steps to enable Categories in the Google Drive app on your Android device. All your questions regarding the same are welcome in the comments section below.
Benefits of Categories in Google Drive
It goes without saying Google Drive is among the most widely used file storage services for both personal and professional use. Moroever, users tend to store a plethora of files of numerous types, from PDF to DOC and even MP3. and why not, after all, you are getting free 15GB of file storage space [which could be expanded to unlimited free storage simply by creating new Google accounts!].
With that said, it usually becomes a tough task to find a file belonging to a particular domain. While there’s always the search functionality available, however, truth be told, no one remembers the entire file name. So combining all these factors, and it proved to be quite a challenging job whenever a need arose to find a file. Well, not anymore.
Thanks to this new Casteogires section in Drive, you will now be able to add each file to its dedicated partition, such as Work, School, Travel, Expenses, and Home. As mentioned above, there are a total of 12 sections which would be more than enough to meet the requirements of the users.
With that said, it’s worth keeping in mind that at the time of writing this post, this feature is still in the testing phase, so unless you root your device and enable it, it might take months until you are blessed with it. And not to mention the fact that rooting in itself brings in quite a few risks [including the failing of Play Integrity]. So weigh in both the risks and benefits and then mold your decision accordingly.